Vagrant 小技巧
Table of Contents
断断续续的用着 Vagrant,本地开发依旧有着不可比拟的优势,POC,demo,hacking 等等
基本命令 #
| 命令 | 作用 |
|---|---|
| vagrant box add <box 名> <box 文件> | 如果缺省 box 文件,将从 vagrant 的网站查询并下载 |
| vagrant box list | 显示本地 box 列表 |
| vagrant box remove | 删除相应的 box |
| vagrant up | 启动当前虚拟机环境 |
| vagrant ssh | 登录虚拟机,也可以指定 hostname |
| vagrant ssh-config | 查看 ssh 登录信息 |
| vagrant status | 获取当前虚拟机的状态,也可以查看指定 hostname |
| vagrant global-status | 显示所有虚拟机环境状态 |
| vagrant suspend | 暂停当前虚拟机环境 |
| vagrant resume | 恢复当前虚拟机环境 |
| vagrant reload | 修改了 Vagrantfile 后,使之生效(相当于先 halt,再 up) |
| vagrant halt | 关闭当前虚拟机环境 |
| vagrant destroy | 删除当前虚拟机环境,释放硬盘空间 |
| vagrant pacakge | 当前的运行的虚拟机环境进行打包 |
plugins #
vagrant-cachier
这玩意在 VM 下载包的时候(agt,yum,etc.)可以缓存,如三台 centOS 的 VM 只需下载 centOS 一次。安装:
$ vagrant plugin install vagrant-cachier
Vagantfile 里加入这段:
	if Vagrant.has_plugin?("vagrant-cachier")
		config.cache.scope = :box
	end
vagrant-hostsupdater
VM 和主机里的 hosts 文件都会得到更新,这样 VM 和主机里的都可以直接通过 hostname 通讯。安装:
$ vagrant plugin install vagrant-hostmanager
Vagantfile 里加入这段:
	if Vagrant.has_plugin?("vagrant-hostmanager")
		config.hostmanager.enabled = true
		config.hostmanager.manage_host = true
		config.hostmanager.ignore_private_ip = false
		config.hostmanager.include_offline = true
	end
swap #
可以通过增加 swap 的方式增加虚机的内存,以免耗尽主机的内存,下面这段代码就是做这件事的:
#!/bin/sh

#create the swap space 1GB
echo "Creating 1GB swap space in /swapfile..."
fallocate -l 1G /swapfile
ls -lh /swapfile

#secure the swapfile
echo "Securing the swapfile..."
chown root:root /swapfile
chmod 0600 /swapfile
ls -lh /swapfile

#turn the swapfile on
echo "Turning the swapfile on..."
mkswap /swapfile
swapon /swapfile


echo "Verifying..."
swapon -s
grep -i --color swap /proc/meminfo

echo "Adding swap entry to /etc/fstab"
echo "swapfile none swap sw 0 0" >> /etc/fstab

echo "Result: "
cat /etc/fstab

echo " ****** We are done !!! ********"
vagrant file 模板 #
模板
# -*- mode: ruby -*-
# vi: set ft=ruby :

ENV["LC_ALL"] = "en_US.UTF-8"

# ---- 虚机配置 ----
N = 1

nodes = [
  {
    :node => "node0",
    :box => "centos/7",
    :cpu => 1,
    :mem => 1024
  }
]

# ---- 各种控制变量 ----
box = "centos/7"
custom_cpu_mem = "yes"
enable_custom_boxes = "yes"
enable_port_forwards = "yes"
linked_clones = "no"
server_cpus = 1
server_memory = 512
additional_nics = "yes"       # yes | no
additional_nics_dhcp = "yes"
additional_nics_num = 1
subnet = "192.168.202."
subnet_ip_start = 200
ansible_groups = {
  "test-nodes" => [
    "node[0:#{N-1}"
  ]
}
port_forwards = [
  {
    :node => "node0",
    :guest => 80,
    :host => 8080
  },
  {
    :node => "node0",
    :guest => 8000,
    :host => 8000
  }
]
provision_nodes = "yes"
synced_folder == "yes"

Vagrant.configure(2) do |config|
  (1..N).each do |node_id|
    nid = (node_id - 1)
	config.vm.define "node#{nid}" do |node|
	  ### 指定 vagrant box
      if enable_custom_boxes == "yes"
        box_set = "no"  #Initially set to no so it can be set to true if found in custom box defined
        nodes.each do |cust_box|
          if cust_box[:node] == "node#{nid}"
            node.vm.box = cust_box[:box]
            box_set = "yes"
          end
        end
        if box_set == "no"
          node.vm.box = box
        end
      end
	  if enable_custom_boxes == "no"
        node.vm.box = box
      end
	  node.vm.provider "virtualbox" do |vb|
        if linked_clones == "yes"
          vb.linked_clone = true
		end
		### 指定 cpu 数
        if custom_cpu_mem == "no"
          vb.customize ["modifyvm", :id, "--cpus", server_cpus]
          vb.customize ["modifyvm", :id, "--memory", server_memory]
		end
		### 指定内存
        if custom_cpu_mem == "yes"
          nodes.each do |cust_node|
            if cust_node[:node] == "node#{nid}"
              vb.customize ["modifyvm", :id, "--cpus", cust_node[:cpu]]
              vb.customize ["modifyvm", :id, "--memory", cust_node[:mem]]
            end
          end
		end
		### 指定 desktop
        if desktop == "yes"
          vb.gui = true
          vb.customize ["modifyvm", :id, "--graphicscontroller", "vboxvga"]
          vb.customize ["modifyvm", :id, "--accelerate3d", "on"]
          vb.customize ["modifyvm", :id, "--ioapic", "on"]
          vb.customize ["modifyvm", :id, "--vram", "128"]
          vb.customize ["modifyvm", :id, "--hwvirtex", "on"]
        end
      end
      node.vm.hostname = "node#{nid}"
      ### 指定网卡
      if additional_nics == "yes"
        if additional_nics_dhcp == "no"
          (1..additional_nics_num).each do |nic_num|
            nnum = Random.rand(0..50)
            node.vm.network :private_network, ip: subnet+"#{subnet_ip_start + nid + nnum}"
          end
        end
        if additional_nics_dhcp == "yes"
          (1..additional_nics_num).each do |nic_num|
            node.vm.network :private_network, type: "dhcp"
          end
        end
      end
	  ### 指定端口
	  if enable_port_forwards == "yes"
        port_forwards.each do |pf|
          if pf[:node] == "node#{nid}"
            node.vm.network "forwarded_port", guest: pf[:guest], host: pf[:host] + nid
          end
        end
	  end
	  ### 指定 ansible 初始化
      if provision_nodes == "yes"
        if node_id == N
          node.vm.provision "ansible" do |ansible|  #runs bootstrap Ansible playbook
            ansible.limit = "all"
            ansible.playbook = "bootstrap.yml"
          end
          node.vm.provision "ansible" do |ansible|  #runs Ansible playbook for installing roles/executing tasks
            ansible.limit = "all"
            ansible.playbook = "playbook.yml"
            ansible.groups = ansible_groups
          end
        end
      end
    end
  end
  if provision_nodes == "yes"
    config.vm.provision :shell, path: "bootstrap.sh", keep_color: "true"  #runs initial shell script
  end
  # 读写共享目录
  if synced_folder == "yes"
    config.vm.synced_folder ".", "/vagrant", mount_options: ["dmode=774,fmode=775"]
  end
end
网络 #
这是最让人困惑的部分,vagrant 本身就是一个脚本工具,需要具体的 vm (Virtualbox,Vmware Workstation 等)配合来实现。下面以 Virtualbox 为例,先了解 Virtualbox 网络方式后,再了解 vagrant 配置。
Virtualbox 网络模式 #
对每个虚拟机,可以配置其 Adapter 的网络模式(Not Attached 和 Generic Driver 这里不讨论):
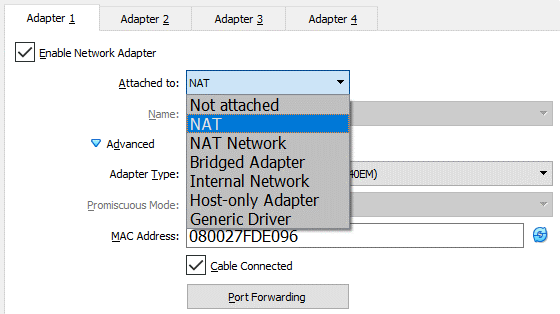
各模式的特点总结如下:
| 网络模式 | VM ↔ VM | VM → Host | VM ← Host | VM → LAN/Internet | VM ← LAN/Internet |
|---|---|---|---|---|---|
| NAT(default) | ➖ | Port Forward | Port Forward | ||
| NAT Network | Port Forward | Port Forward | |||
| Bridged | |||||
| Internal Network | ➖ | ➖ | ➖ | ➖ | |
| Host-only | ➖ | ➖ |
NAT(default) #
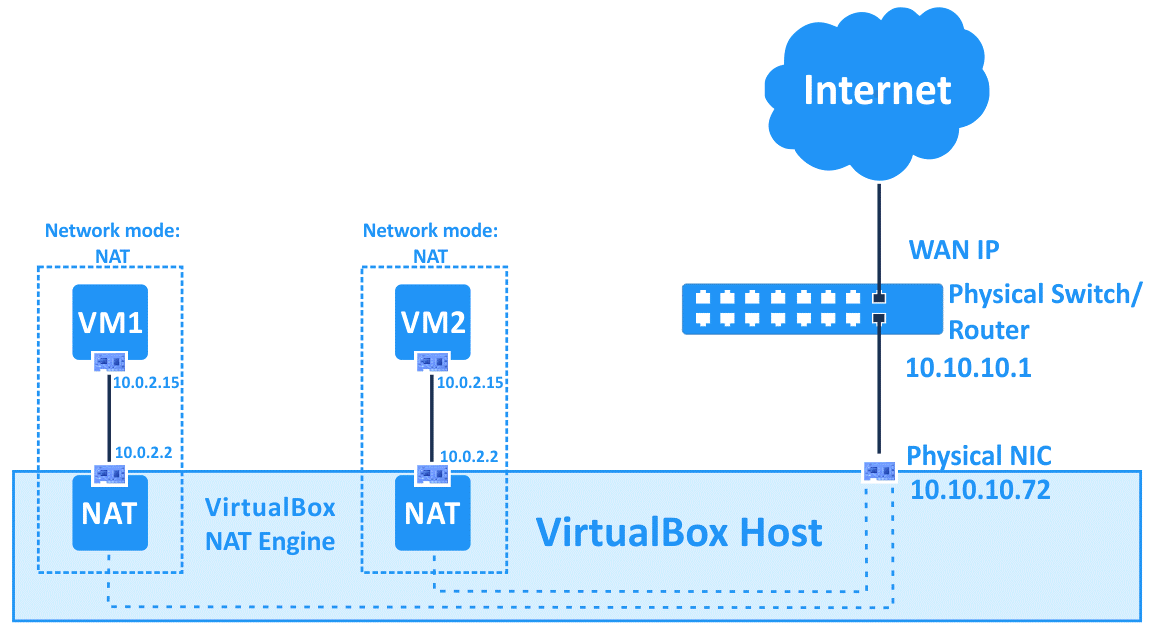
这是默认模式或者通过 GUI/命令行指定,会自动产生一个默认的虚拟 NAT router(图中的 10.0.2.2),通常是虚拟机的 DHCP。
特点:
命令行例子:VBoxManage modifyvm VM_name --nic1 nat

-   虚拟机可以直接访问 Internet
-   每台虚拟机完全隔离
缺点:
-   虚拟机之间无法通信
-   宿主机和虚拟机也无法通信,除非把虚拟机的端口暴露出来(port forwarding),但一个端口只能对应一个虚拟机
NAT Network #
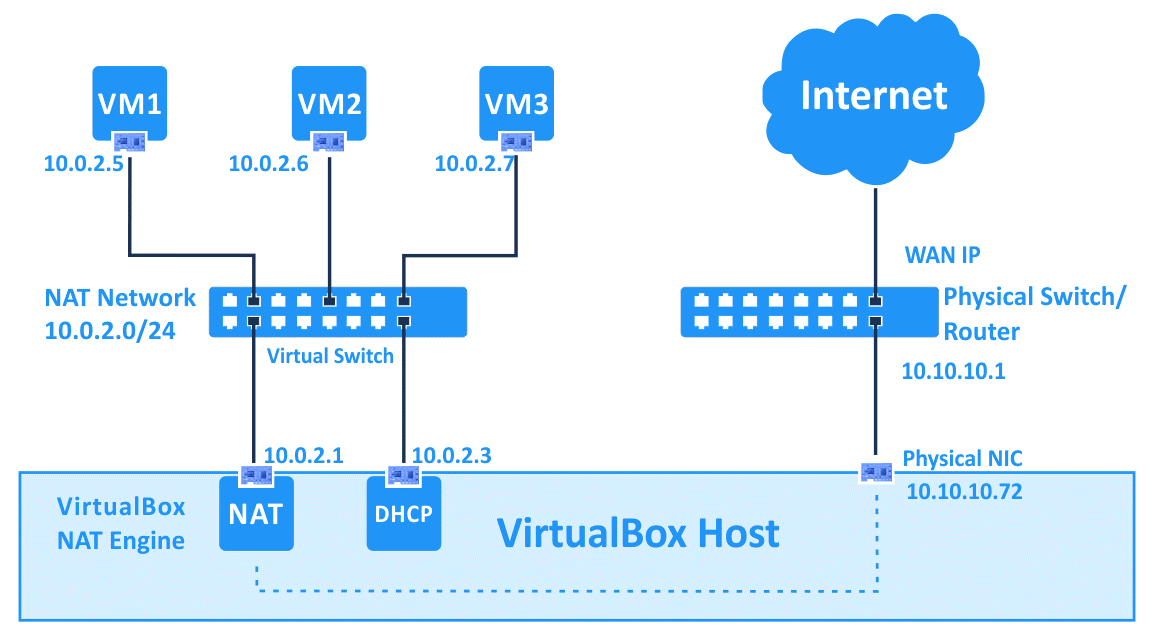
和 NAT 类似,这种模式下,还会按照要求产生一个虚拟的 NAT network(图中的 10.0.2.0/24),默认的 Gateway(10.0.2.1)也会自动产生。
特点:
命令行例子:VBoxManage natnetwork add --netname natnet1 --network "192.168.22.0/24" --enable

-   虚拟机可以直接访问 Internet
-   虚拟机之间可以通信
缺点:
- 宿主机和虚拟机也无法通信,除非把虚拟机的端口暴露出来(port forwarding),但一个端口只能对应一个虚拟机
Bridged Adapter #
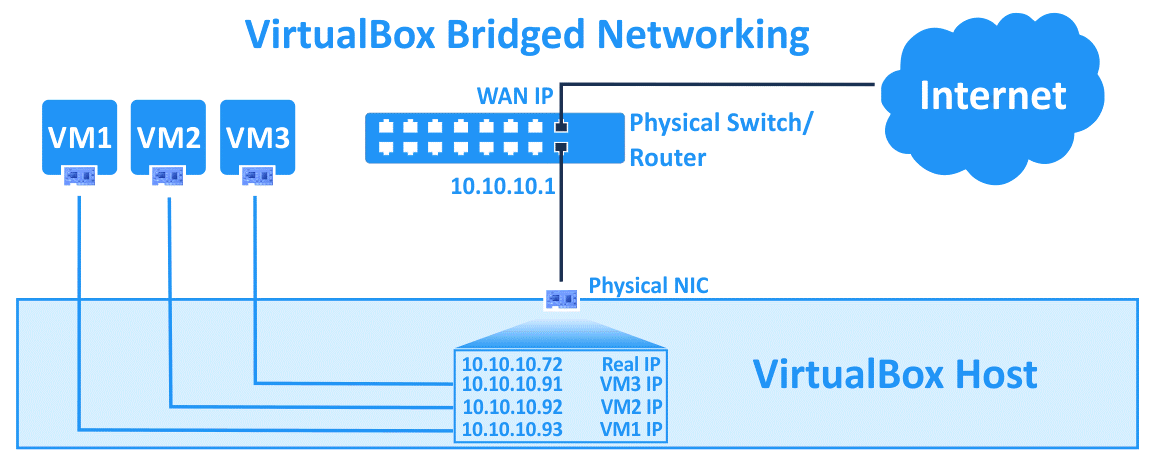
这是默认模式,会产生一个默认的 router/gateway(例如图中的 10.0.0.2)
特点:
-   完全暴露虚拟机
-   虚拟机和宿主机处在统一网络
缺点:
-   需要让网络卡工作在 Promiscuous 模式下(一个网络卡绑定不同的 MAC 地址,接收所有的 packet),不少 wireless 网络卡不支持这一模式
-   通常公司网络都采用 DHCP,所以有可能无法指定虚拟机的 IP,或者违反公司的网络安全策略
Internal Network #
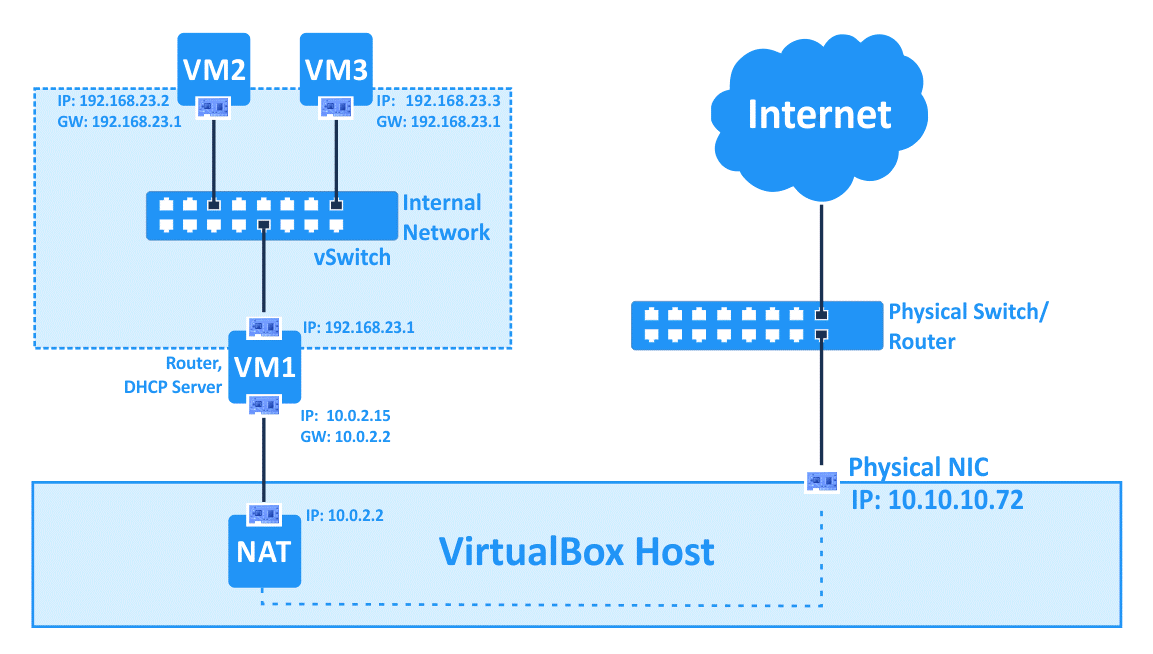
注意,上图显示的是个混合模式,VM1 配置成 NAT 模式,VM2 & VM3 只是 Internal Network 模式,但同时指定 VM1 为 gateway,这样就可以通过 VM1 连接 Internet。
特点:
-   方式简单
-   虚拟机之间可以通信
缺点:
- 和外界完全隔离
Host-only #
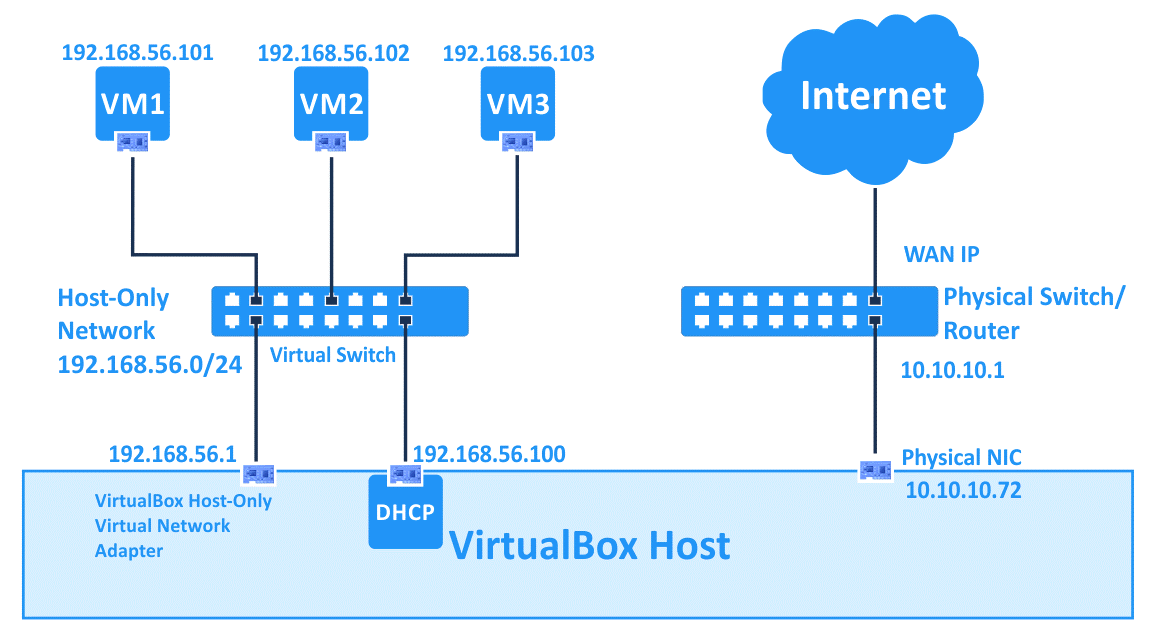
先配置多一个虚拟的 Host 网卡,让所有的 VM 和 Host 共享。
特点:
-   虚拟机之间可以通信
-   虚拟机和宿主机之间可以通信
缺点:
- 和外界完全隔离
vagrant 网络模式 #
vagrant 定义/支持三种网络模式:
- port forwarding(default):对应 Virtualbox 的 NAT
- private network:对应 Virtualbox 的 Host-only 或者 Internal Network
- public network:对应 Virtualbox 的 Bridged Network
注意的是,Vagrant 启动虚拟机时,会自动在虚拟机中添加一块 Virtualbox NAT 类型的网卡,然后再创建 Vagrantfile 配置文件所描述的网络。Vagrant 将宿主机的 TCP/2222 端口转发到 虚拟机的 TCP/22 端口,这样就可以使用 vagrant ssh 命令快速地连接虚拟机。同时,虚拟机使用这块自动创建的 NAT 网卡访问外部网络。
常用的配置情况:
外网(bridged) #
# Create a public network, which generally matched to bridged network.
# Bridged networks make the machine appear as another physical device on
# your network.
config.vm.network "public_network"
此时,vm 在宿主机所在的 LAN 中等价于一台物理机器,最好在 DHCP 里通过 mac 绑定为 VM 保留一个固定的 dhcp 地址,这样 VM 无论何时启动都会获取到相同的 IP 地址,这时 VM 暴露出来,开发和调试将会很顺利很简单。
内网 + Internet(混合模式) #
config.vm.network "private_network", ip: "192.168.33.10"
标识符“private_network“总是被映射为 Virtualbox 的 Host-only 模型,同时 vagrant 自动创建 NAT 网卡,混合网络非常适合本地开发和测试,VM 可以通过 NAT 和 Internet 相通,然后多个 VM 之间也能相互通信。
内网(internal) #
当指定了两个以上的 private_network 的话,vagrant 不再自动创建 NAT 网卡,这时具有两个或以上的 host-only 网络。
config.vm.network "private_network", ip: "192.168.33.10"
config.vm.network "private_network", ip: "192.168.55.10"
也可以强制指定:
config.vm.network "private_network", ip: "192.168.33.10", virtualbox__intnet: true
内外网 #
同时具有 bridged 和 host-only 网络:
config.vm.network "public_network"
config.vm.network "private_network", ip: "192.168.33.10"